


 11 / 64

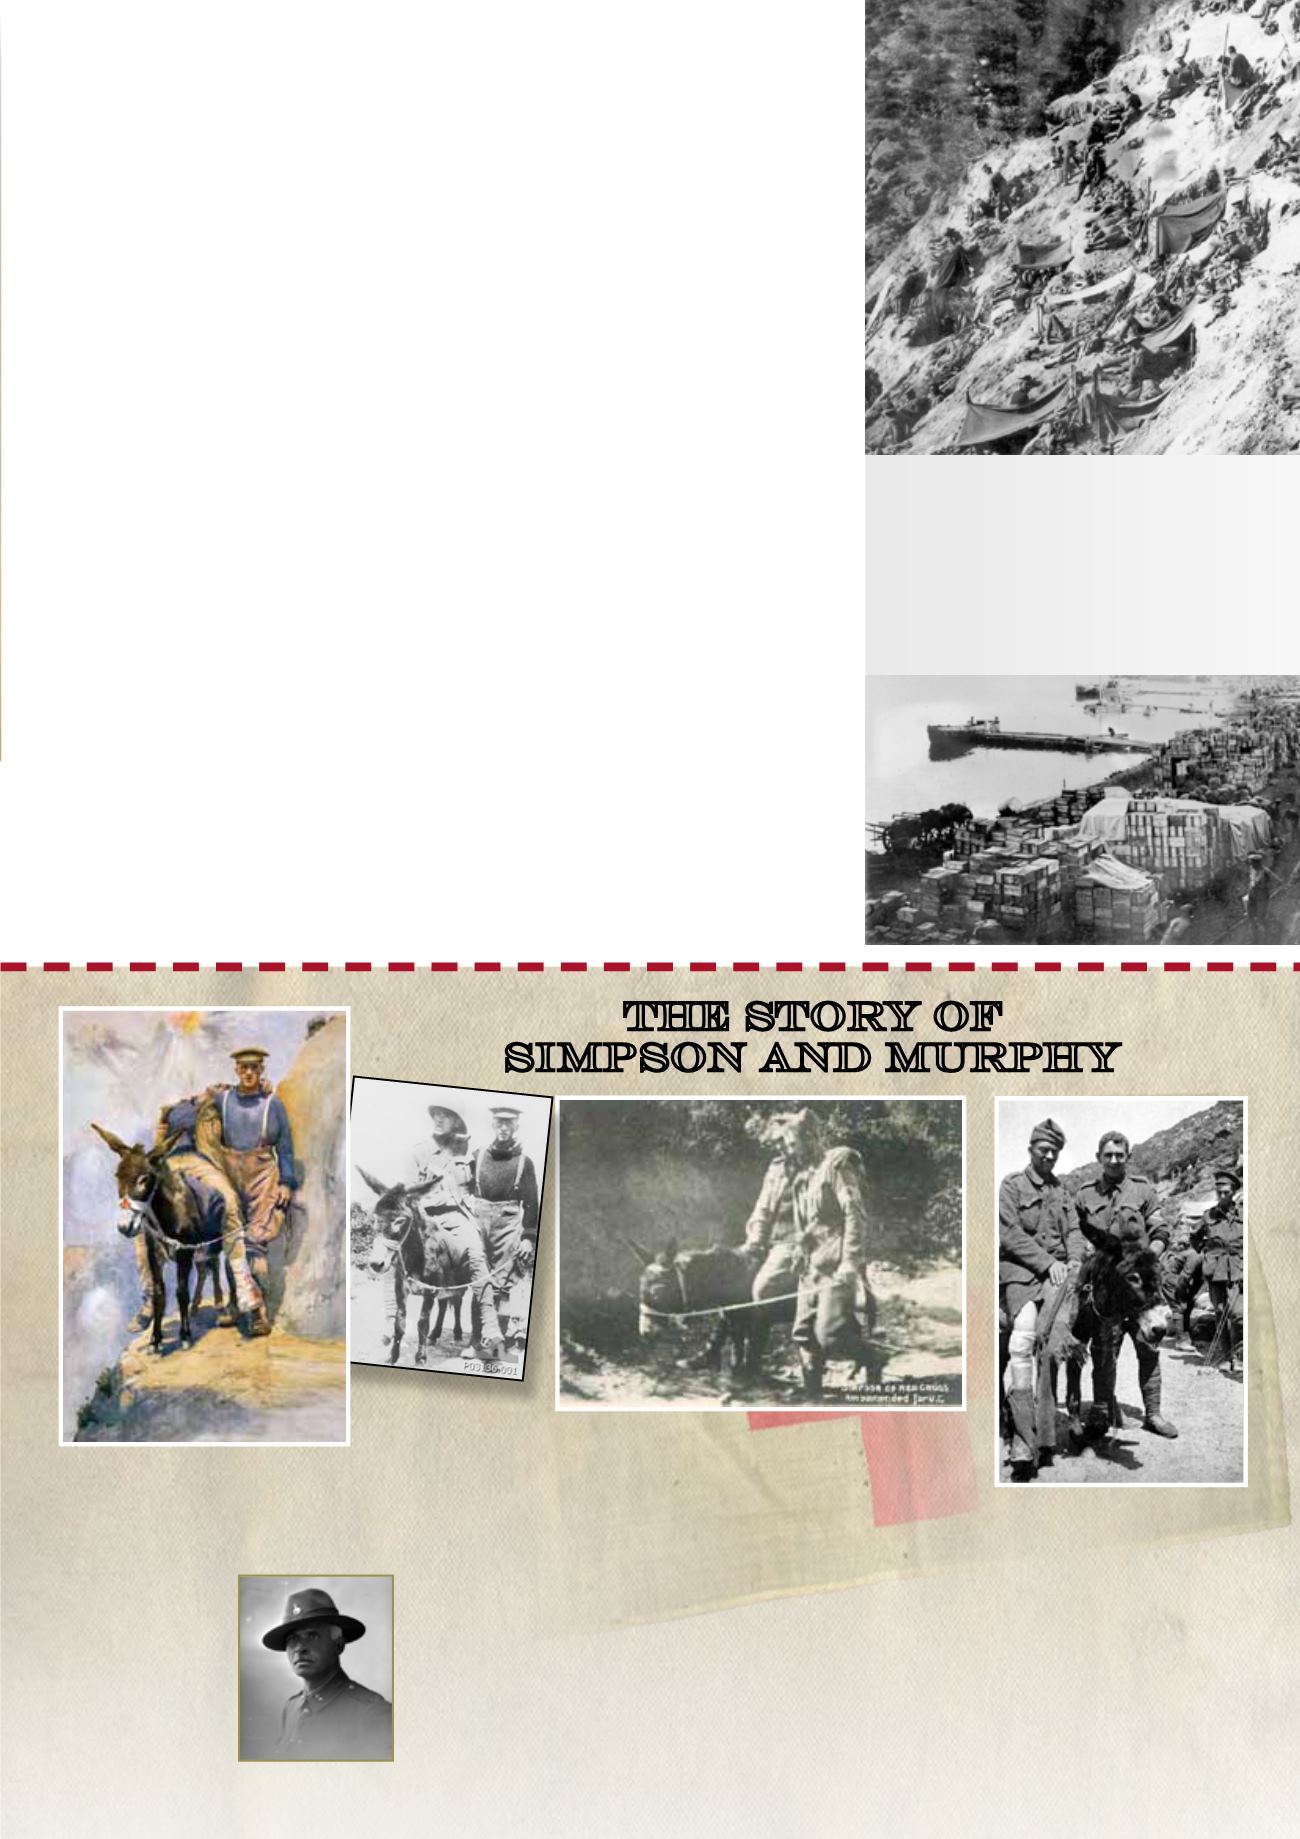
The cliffs around Anzac Cove were steep, rocky and
crumbly, covered in either sandpits or with shoulder
high shrubs. ANZAC forces dug into a cliff; improved
sandbagged trenches followed. This image captures
the challenging conditions. It is incredible that they
were able to succeed in making meagre advances
with the enemy above firing down on them...or
straight at them once they dug in on top.
Below: Supplies pile up on the cove’s narrow beach.
Churchill has his go at the Dardanelles
Churchill’s well-armed navy fleet (now including
submarines) from Britain and France had
inflicted heavy damage to Turkey’s fortresses
protecting the Dardanelles, but these could not
be fully captured by the battleships. Mines also
claimed several ships and damaged others.
Instead of pressing forward, Churchill paused,
and sent for foot soldiers from the British,
French, and the now handy ANZAC forces in
Egypt. Meanwhile the Allies benefitted in that
Turkey’s own use of their channel was stymied.
It was proposed that the ANZACs would land
mid-peninsula on the Aegean Ocean side of the
Gallipoli peninsula in Turkey, and push across
its ten mile width. The Brits would attack the
southern tip and push north. French troops
would attack on the land across the strait, near
the ancient city of Troy. The hope was that the
Turkish forces would be defeated, expelled and
the Allies would control the shipping channel
itself and the land surrounding it. Then, on to
take Constantinople…
The ANZAC forces land on Gallipoli
In the darkness of early morning on April 25,
waves of Aussie and then NZ troops were
rowed ashore from troop carriers, but sadly
they landed a mile off target, at a small cove,
later named Anzac Cove. This was a narrow
exposed beach backed by steep scrub-covered
cliffs, its ridges topped with Turkish snipers.
This landing and defence of the beachhead
proved to be a bloody and expensive conflict
with significant loss of lives. That first day, over
650 Aussies and 147 Kiwis were killed. The
Allies’ hospital ship at the cove accepted over
550 casualties that first day and the ANZAC
nurses seemed to share one sentiment: “This
was not what they signed up for.”
Many ANZACs were shot without even having
placed a foot on the beach; in the boats or
while frantically wading ashore, under fire from
an enemy with the advantage of concealment,
height and proximity. The Turks (numbering
initially only 200) were afforded a perfect
defensive position and suitable range from
which incoming soldiers could be picked off.
However Aussie and NZ troops (each carrying
40 kilos of gear), supported by firepower from
the ships, bayonetted and clawed their way up
the steep terrain, pushing back defenders and
dodging bullets. Reinforcements landed, and
those who made it up the cliffs struggled on,
eventually capturing several ridges, and kept
pushing forward until the Turks received their
reinforcements of men, arms, and ammo.
The light unit of Turkish soldiers, who took the
brunt of the attack, ran out of ammo. They
were retreating, but were ordered by their
commander, Mustafa Kemal Ataturk: “I do not
order you to fire, I order you to die.” They stood
their ground, with only bayonets, and died until
reinforcements arrived.
Ultimately, the ANZACs held a half mile of ridge
territory before being stopped, a line that did not
move much in the stalemated fighting to come.
Gallipoli drags on...miserably
Both sides dug into deep trenches – in places
only 10m away from each other. The ANZACs
also dug tunnels to move supplies and evacuate
the dead and wounded. They fought with valour
– through exhaustion, disease, malnutrition,
injuries and the frustration of the stalemate. Many
dead comrades rotted atop the ground in No
Man’s Land, filling the air with stench and swarms
of disease-carrying flies. Countless bodies were
never recovered nor given proper burial. This was
The story of
simpson and murphy
The actual
John Simpson
evacuates a
wounded
soldier (also at
right).
English born John Simpson Kirkpatrick joined
the Aussie armed forces as ‘John Simpson’, and
was assigned to the ambulance corps.
At Gallipoli he commandeered a donkey, referred
to as ‘Murphy’ (aka Duffy or Abdul) to handle
the steep terrain. It is said that together they
evacuated over 300 wounded soldiers over the
next 24 days, tirelessly working day and night,
often under heavy gunfire.
The stalwart brave pair became a mythic
inspiration to ANZAC troops, but on 19 May,
1915 a bullet found him. He was held to
represent all the finest qualities of the ANZACs,
in particular the stretcher bearers. Dead at
age 23, yet his legend lives on through this
art poster, several books and statues in both
Australia and the UK.
One book,
Simpson and his Donkey
, by Mark
Greenwood, included the little known story of
how, without realising it, Simpson had actually
rescued a childhood friend.
Simpson has yet to be awarded the Victoria
Cross...though Murphy was honourably
decorated.
continued next page
NZ war artist Horace Moore-Jones,
wounded at Anzac Cove, returned
home to create over 80 watercolours,
including the well known
Simpson
and his Donkey
, (above left), which
inspired admiration
for the entire corps.
An ironic twist is that
the painting was
actually done from a
photo of Simpson’s
replacement, Waihi
born, Private Richard
Henderson (above
right).
WWW.COROMANDELLIFE.CO.NZ11
Horace Moore-Jones
Legendary Heroes of Anzac Cove